> ## Documentation Index
> Fetch the complete documentation index at: https://support.amplify.xyz/llms.txt
> Use this file to discover all available pages before exploring further.
# SAML Single Sign-On
Security Assertion Markup Language (SAML) is an XML-based framework for enabling authentication through a third party identity provider or in-house single sign-on application.
SAML comes in handy for organizations which use multiple applications or services and need a single source to manage member activity. Instead of creating multiple credentials for different applications, with SAML you can create one set of credentials per member and allow them to access multiple applications.
SAML offers the ability to:
* Manage a password policy across multiple applications
* Access multiple applications securely
* Reduce the risk of lost or forgotten passwords
**Note**
* Enabling SAML will mandate all users to sign in only via SAML.
* Okta, Google and Azure AD are the supported IdPs. If you are using a different IdP, please raise a request to **Amplify support ([support@amplify.xyz](mailto:support@amplify.xyz))**.
* Only one IdP can be configured at a time.
* The team member's email address must be present in **Amplify** and the IdP.
***
## Terminology
**Team Member:**\
A Team Member is an employee of the organization, say, Acme Inc, and is an authorized user of Acme Inc's **Amplify** user interface.
**Authentication:**\
The verification mechanism that certifies an individual is the actual person they claim to be.
**IdP:**\
Identity Provider (IdP) is the platform or application that provides authentication for the member.
**SP:**\
Service Provider (SP) is the application that needs authentication for allowing access to the member. For the entirety of this document, **Amplify** is the Service Provider.
**Login URL:**\
This URL will take you to the IdP's login page asking for your credentials. Login URL is provided by your IdP and must be added in **Amplify** while integrating.
**X.509 Certificate:**\
**Amplify** accepts only X.509 Certificates to validate the authenticity of an IdP.
***
## Login Options
You can log in to **Amplify** using one of the ways listed below.
### Sign in via IdP
1. Log into your IdP.
2. Select **Amplify** from the list of applications.
3. You will be taken to the **Amplify Dashboard**.
### Sign in via Amplify
1. On the login page, click **Log in with SSO**.
2. Enter the email in the text box provided and click **Sign in**.
3. You will be taken to your IdP's login screen. Enter your credentials and click **Sign In**.
***
## Okta as IdP
You can add the **Amplify** app in Okta using the steps below:
1. Log in to your Okta account and go to **Applications** and **Create App Integration**.
2. Use the following values:
* [**https://app.amplify.xyz/login/**](https://app.amplify.xyz/login/) – for **ACS URL (Assertion Consumer Service URL)**
* [**https://app.amplify.xyz/**](https://app.amplify.xyz/) – for **Entity ID**
3. Click **View Setup Instructions** under the **Sign On** tab to get the:
* Login URL
* SAML Certificate\
\\
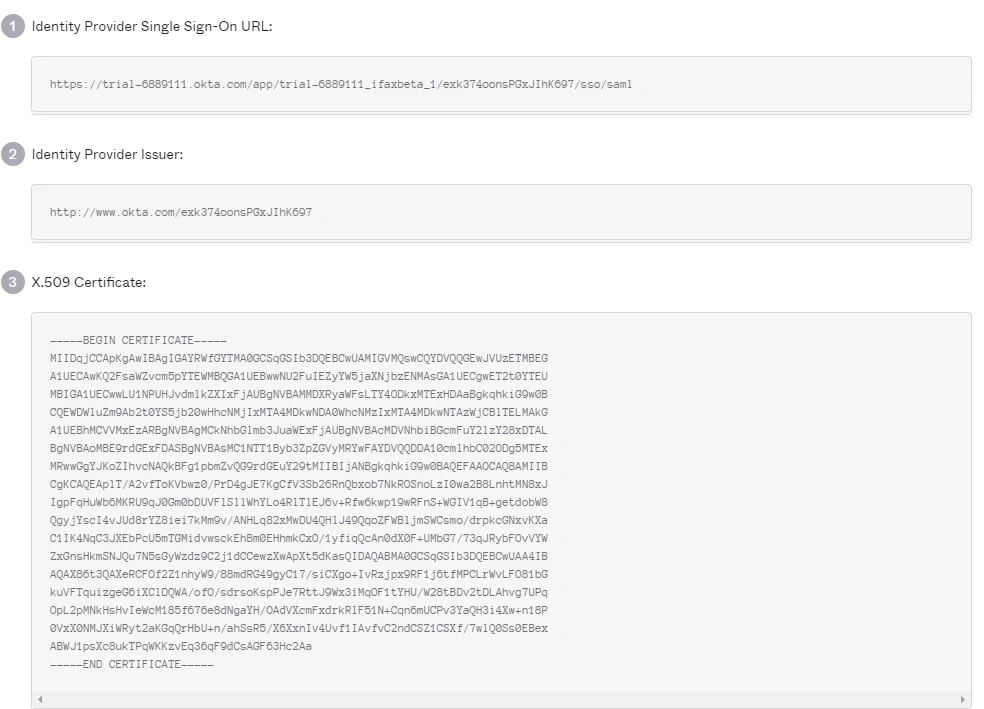 These are required and need to be pasted in your **Amplify user interface** while enabling SAML.
***
## Google as IdP
You can add the **Amplify** app in Google using the steps below:
1. Log in to your Google admin account and search for **Amplify** under **Add applications**.
2. Use the following values:
* `https://www.ifaxapp.com/login/` – for **ACS URL (Assertion Consumer Service URL)**
* `https://www.ifaxapp.com/` – for **Entity ID**
3. Click **View Setup Instructions** under the **Sign On** tab to get the:
* SSO URL
* SAML Certificate\
\\
These are required and need to be pasted in your **Amplify user interface** while enabling SAML.
***
## Google as IdP
You can add the **Amplify** app in Google using the steps below:
1. Log in to your Google admin account and search for **Amplify** under **Add applications**.
2. Use the following values:
* `https://www.ifaxapp.com/login/` – for **ACS URL (Assertion Consumer Service URL)**
* `https://www.ifaxapp.com/` – for **Entity ID**
3. Click **View Setup Instructions** under the **Sign On** tab to get the:
* SSO URL
* SAML Certificate\
\\
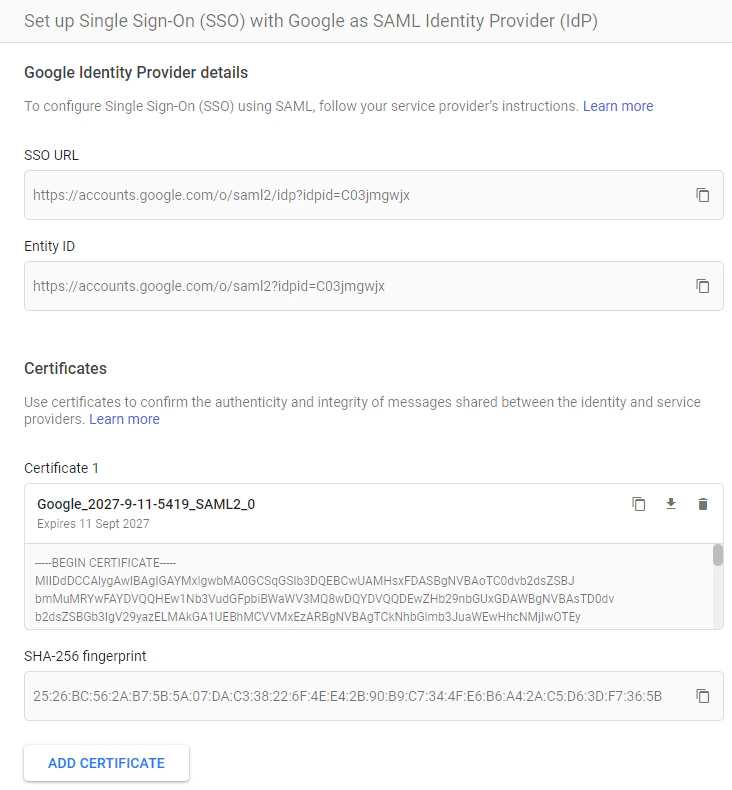 These are required and need to be pasted in your **Amplify user interface** while enabling SAML.
***
## Azure AD as IdP
You can add the **Amplify** app in Microsoft Azure Active Directory using the steps below:\
\\
1. Sign in to your Microsoft Azure site (through **portal.azure.com**).
2. Go to **Azure Active Directory → Enterprise applications → New application → Non-gallery application** and add an application by naming it **Amplify**.
3. Go to the newly created **Amplify** application and select **Single sign-on** found on the left pane and choose **SAML**.
4. Click **Edit** against the **Basic SAML Configuration** section and enter:
* `https://www.ifaxapp.com/` – for **Identifier (Entity ID)**
* `https://www.ifaxapp.com/login/` – for **Reply URL (Assertion Consumer Service URL)**
5. Scroll down to the **Setup Amplify** section. Copy the **Login URL** and paste it in the field provided in **Amplify's SAML Configuration page**.
6. In the **SAML Signing Certificate** section, use the URL given against **App Federation Metadata URL** and copy the content present between the start and end tags of ``. Paste it in **Amplify's SAML Certificate field**.\
\\
These are required and need to be pasted in your **Amplify user interface** while enabling SAML.
***
## Azure AD as IdP
You can add the **Amplify** app in Microsoft Azure Active Directory using the steps below:\
\\
1. Sign in to your Microsoft Azure site (through **portal.azure.com**).
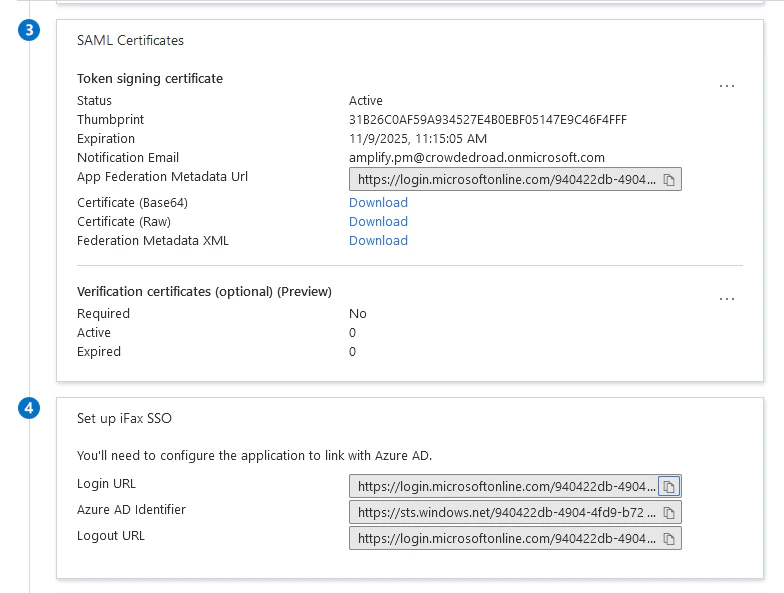
2. Go to **Azure Active Directory → Enterprise applications → New application → Non-gallery application** and add an application by naming it **Amplify**.
3. Go to the newly created **Amplify** application and select **Single sign-on** found on the left pane and choose **SAML**.
4. Click **Edit** against the **Basic SAML Configuration** section and enter:
* `https://www.ifaxapp.com/` – for **Identifier (Entity ID)**
* `https://www.ifaxapp.com/login/` – for **Reply URL (Assertion Consumer Service URL)**
5. Scroll down to the **Setup Amplify** section. Copy the **Login URL** and paste it in the field provided in **Amplify's SAML Configuration page**.
6. In the **SAML Signing Certificate** section, use the URL given against **App Federation Metadata URL** and copy the content present between the start and end tags of ``. Paste it in **Amplify's SAML Certificate field**.\
\\
 ***
## Configure SAML in Amplify
1. Log in to **Amplify** and navigate to\
**Settings → Team & SSO → SSO**.
2. Enable **Single Sign-On**.
3. Paste the **Login URL** and the **X.509 Certificate** retrieved from the IdP.\
\\
***
## Configure SAML in Amplify
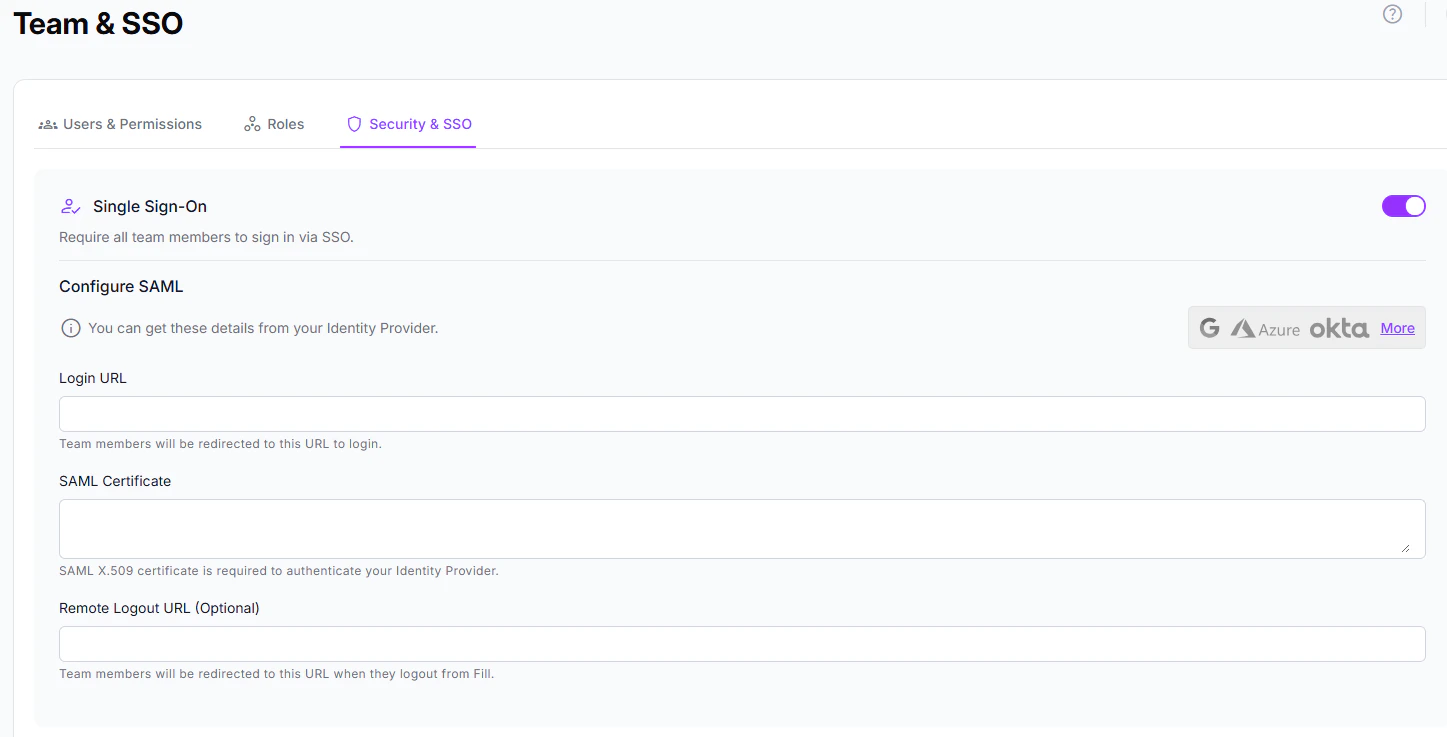
1. Log in to **Amplify** and navigate to\
**Settings → Team & SSO → SSO**.
2. Enable **Single Sign-On**.
3. Paste the **Login URL** and the **X.509 Certificate** retrieved from the IdP.\
\\
 ***
## Disable SAML
To disable SAML, go to **Settings → Team & SSO → SSO** and disable **Single Sign-On**.
When you disable SAML in **Amplify**, your team members will be notified that SAML has been disabled and they should sign in using custom credentials.
***
## Email Notifications
Your team members will receive a system-generated email during the following events:
* When an admin enables SAML for the organization's **Amplify** site
* When a new team member is added to the organization's **Amplify** site
* When SAML is disabled
***
## Disable SAML
To disable SAML, go to **Settings → Team & SSO → SSO** and disable **Single Sign-On**.
When you disable SAML in **Amplify**, your team members will be notified that SAML has been disabled and they should sign in using custom credentials.
***
## Email Notifications
Your team members will receive a system-generated email during the following events:
* When an admin enables SAML for the organization's **Amplify** site
* When a new team member is added to the organization's **Amplify** site
* When SAML is disabled